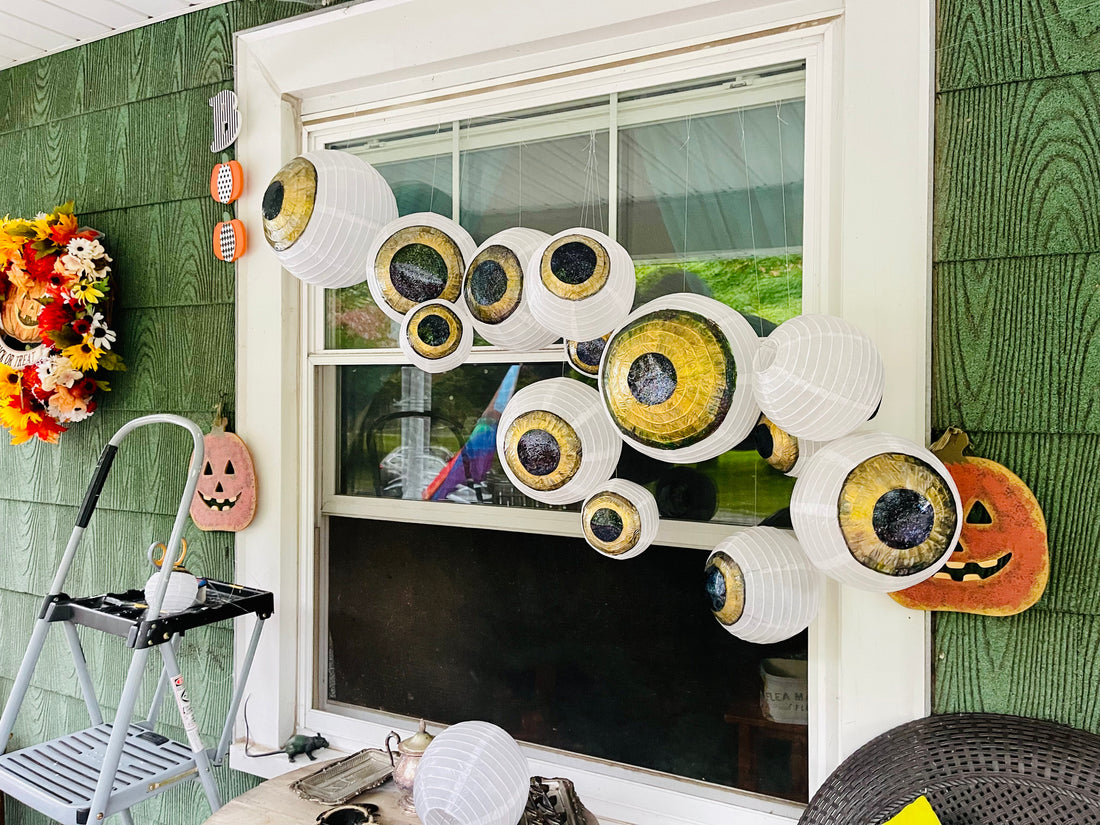
In my last studio update I talked about how I want to lean into my creativity and things that bring me joy. As the days are getting shorter and shorter and we are swapping our shorts for pants and snuggly scarves, our garden is gently falling asleep for the season and our yard is transforming for (with) autumn.
Part of embracing creativity for me means paying attention to seasonality.
Halloween is pretty big in our neighborhood. We live in a large cul-de-sac with a public park in the middle, so it is ideal for trick-or-treating. The city closes off the streets, people set up really big seasonal displays, have outdoor fires, food & beverages. This is exactly the perfect encouragement to explore my spooky crafty side for halloween. I was scrolling through pinterest, as I do, when I came across a family costume idea that used paper lanterns as eyeballs. Not only did I think they looked really cool, but my partner is super into eyeballs in art *and* I was pretty confident I could use the idea as a launching point to create some DIY decor for our porch.
Materials:
♥ Paper lanterns (I purchased this pack)
♥ Paddle wire
♥ Gold Paint (I used this one And this one)
♥ Black Paint (I used this)
♥ Black Paper
♥ Hot glue gun & hot glue sticks
♥ Wooden beads
Process
♥ Step One: Assemble all your paper lanterns. Use small pieces of paddle wire to secure the metal supports so they don’t collapse while you are working on your eyeballs.
♥ Step Two: Coat each eyeball with two layers of mod podge, making sure to allow the lanterns to fully dry between layers. This is going to add extra stability to the paper lanterns and make them less likely to tear. I also really liked how the paper got a little more transparent and waxy looking.

♥ Step Three: Paint the iris! I used payne’s grey and gold paint for these eyeballs. The kiddos experimented with a variety of colors, including making a galaxy-themed eyeball inspired by dragons. Their interest had an expiration date, however and it was quickly evident that I was on my own for the rest of this project. I eventually found that building up thin layers of paint worked best for me, and once I got the hang of it, I used an assembly-line approach to get them painted as quickly as possible.


♥ Step Four: Once the irises are completely dry, you can work on the pupils. Cut your black paper into a circle. You will want this to be at least slightly larger than the hole on the end of the lantern. Different sized pupils will make for more variety and interest. Use hot glue to affix the pupil to the lantern. Be thorough here. I found it worked best to run a line of hot glue around the entire circumference of the paper circle, set it on the lantern and press down gently until it adhered to paper. Hold it in place until the glue sets, then apply more hot glue around the edges wherever there is a gap between the black paper pupil and the lantern.
♥ Step Five: At this point, you've got your basic eyeballs. This step is intended to add extra durability and pizazz. Add a coat of black paint to the pupil. Once that dries, coat the entire iris and pupil with Glitter Effects Mod Podge. Finally, add a top coat of Diamond Glaze for the extra juicy, wet look.

Possible Variations: I think this is a project I will want to expand on in the future. I’d like to create more eyeballs in a variety of colors and test out different surface coatings, including a clear coat spray. I happened to have mod podge and diamond glaze on hand, so that’s what I used. Just imagine... different color glitter! Glitter effects! Reflective paint! Glow in the dark paint! Eeps!
♥ Step Six: Hang your eyeballs! I used monofilament (fishing line) to string a line along my porch where there were already some eye hooks from the previous homeowners. Then, I poked a small hole in each lantern using a sharp toothpick. I threaded monofilament through that hole, securing it with a wooden bead. I tied a loop at the other end of the line, so the individual eyeballs could hang separately.

All I needed to do next was string each eyeball loop onto the main monofilament. What I like most about this installation is that the eyeballs can move freely with the breeze without getting torn off the porch. They just keep sliding around on the monofilament and I think that looks pretty cool.

♥ Step Seven: This is totally optional, but now you can work fairy lights into your cluster of eyeballs! I opted for these fun multi-colored, solar-powered lights because I thought they were a little more in the spirit of halloween.
By the way, this is a fantastic project to get kiddos involved in - for as long as you can hold their attention :)


